Getting Started
This guide covers the most important first steps for working with Antares Web Interface. It is intended for users who are working with our Antares environment for the first time.
1. Change Your Password
After receiving your Antares user account, the first step should be to change the initially assigned password.
Change the Password
- Log in to the Antares Dashboard.
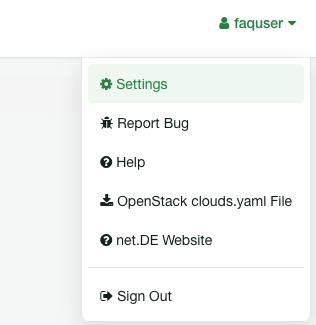
- Open the user menu in the upper-right corner.
- Select Settings.
- Open Change Password.
- Enter your current password.
- Enter a new, secure password.
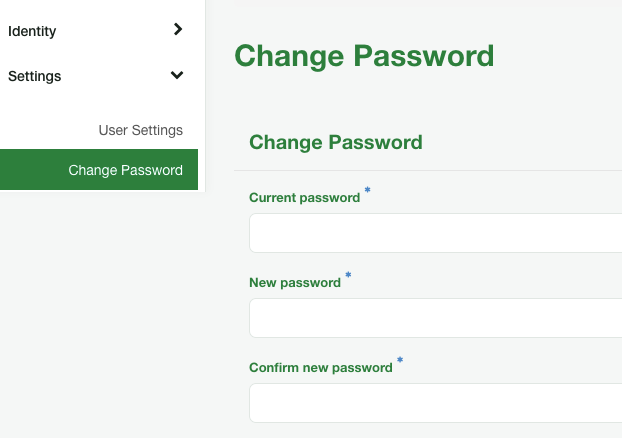
- Save the changes.
Recommendation
Use a unique and sufficiently long password for your Antares account. Avoid reusing passwords from other services.
2. Add an SSH Key Pair
Linux instances are usually accessed using SSH keys instead of passwords.
An SSH key pair consists of two parts:
- Private Key – remains exclusively on your local computer.
- Public Key – is stored in Antares and added to an instance during creation.
Protect Your Private Key
Never upload your private key to Antares and never share it with other people.
Use an Existing SSH Key
If you already have an SSH key, it is usually located in the following directory on Linux:
Typical files are:
The file ending in .pub contains the public key and can be imported into Antares.
Create a New SSH Key
If you do not already have an SSH key, creating an ED25519 key is recommended:
Follow the instructions shown by ssh-keygen.
By default, the following files are created:
The files have different purposes:
Import the Public Key into Antares
In the Horizon Dashboard:
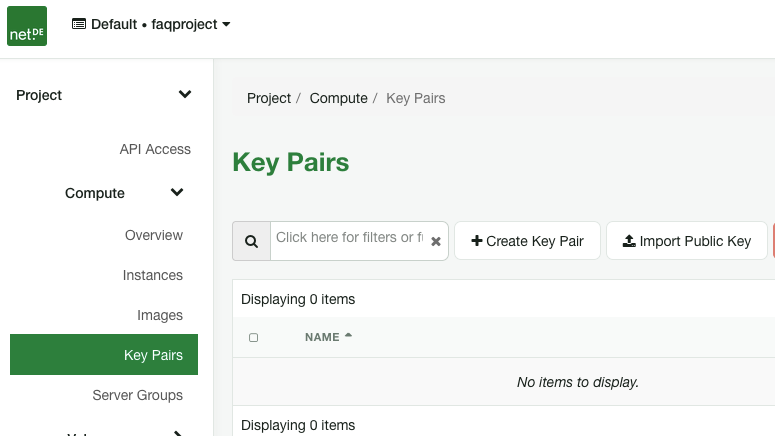
- Open Project → Compute → Key Pairs.
- Select Import Public Key.
- Enter a descriptive name, for example:
- Paste the contents of your
.pubfile. - Import the key.
The key pair can now be selected when creating an instance.
3. Network Basics
An Antares instance is normally connected to a private network.
A typical network configuration looks like this:
Internet / External Network
│
│
[ Floating IP ]
│
[ Router ]
│
│
[ Private Network ]
│
│
[ Instance ]
The instance initially receives a private IP address, for example:
This address is normally only reachable within the Antares network environment.
To make an instance reachable from an external network, a Floating IP can be assigned to it.
4. Create a Private Network
Before creating an instance, create a private network for your project.
Create the Network
In the Horizon Dashboard:
- Open Project → Network → Networks.
- Select Create Network.
- Enter a name, for example:
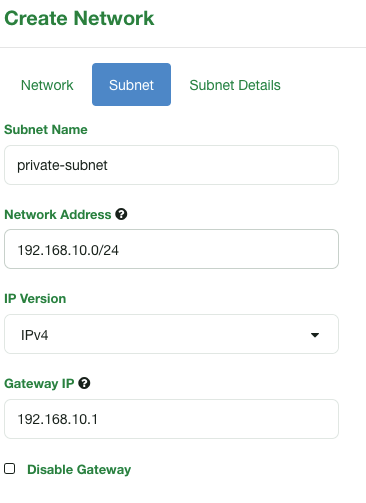
- Create a subnet for the network.
An example configuration could look like this:
| Setting | Example |
|---|---|
| Network Name | private-network |
| Subnet Name | private-subnet |
| Network Address | 192.168.10.0/24 |
| IP Version | IPv4 |
| Gateway | 192.168.10.1 |
| DHCP | Enabled |
Antares can then automatically assign IP addresses from this subnet to instances using DHCP.
Note
The private IP ranges you are allowed to use may be defined by the operator of your Antares environment.
What Does /24 Mean?
The value
describes an IPv4 network using CIDR notation.
In simple terms, it defines the address range in which the private IP addresses are located.
For most users, it is sufficient to understand that all instances connected to this subnet will receive addresses from the configured private network.
5. Create a Router
A virtual router is required to connect the private network to an external network.
The router is also an important requirement for using Floating IPs.
Create the Router
In the Horizon Dashboard:
- Open Project → Network → Routers.
- Select Create Router.
- Enter a name, for example:
- Select the external network public1 as External Network.
- Create the router.
Connect the Private Subnet
After creating the router:
- Open the newly created router.
- Select Interfaces.
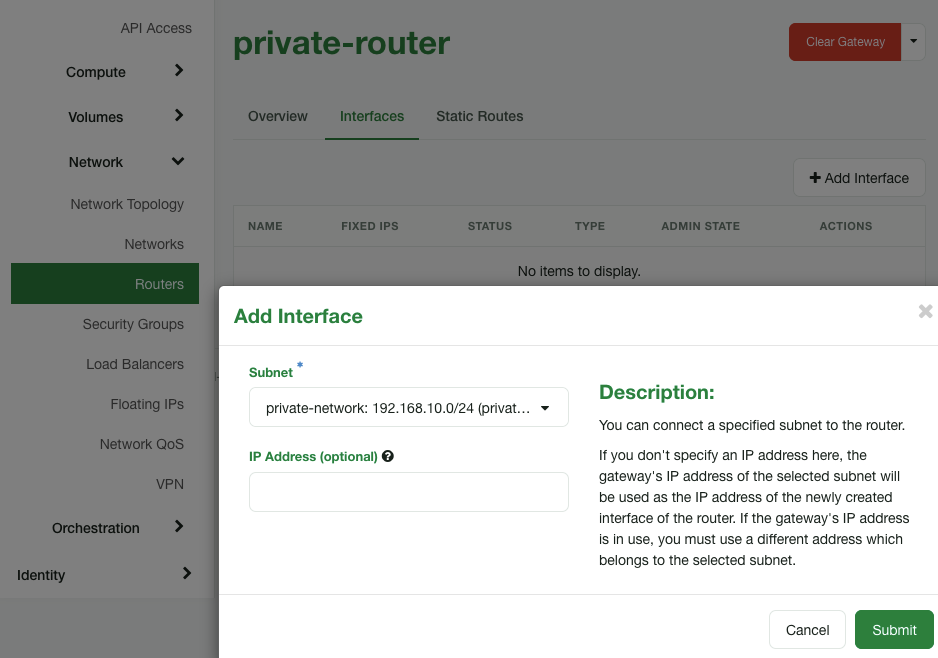
- Select Add Interface.
- Select the previously created network:
- Add the interface.
The resulting network structure looks like this:
The basic network infrastructure required for Floating IPs is now available.
6. Floating IPs
A Floating IP is an external IP address that can be dynamically assigned to an instance.
The instance keeps its private IP address.
For example:
One advantage of Floating IPs is that they are not permanently tied to a specific instance.
A Floating IP can be:
- assigned to an instance,
- removed from an instance,
- reassigned to another instance.
Allocate a Floating IP
In the Horizon Dashboard:
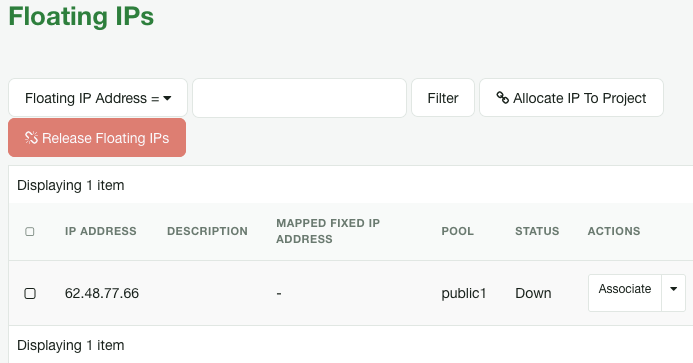
- Open Project → Network → Floating IPs.
- Select Allocate IP to Project.
- Select the external network or Floating IP pool.
- Allocate the address.
Assign a Floating IP to an Instance
Open:
Project → Compute → Instances
Then:
- Select the desired instance.
- Open Actions → Associate Floating IP.
- Select an available Floating IP.
- Confirm the assignment.
Warning
Assigning a Floating IP does not automatically make an instance accessible.
The instance's Security Group must also allow the required network traffic.
7. Security Groups and Security Rules
Security Groups act as virtual firewalls for Antares instances.
A Security Group contains one or more Security Rules that define which network traffic is allowed.
An instance can be assigned to one or multiple Security Groups.
Ingress and Egress
Security Rules distinguish between two directions:
| Direction | Meaning |
|---|---|
| Ingress | Traffic entering the instance |
| Egress | Traffic leaving the instance |
For example, allowing SSH access requires an Ingress rule for TCP port 22.
The default Security Group
Every Antares project usually contains a Security Group named:
The exact rules may have been modified by your Antares operator.
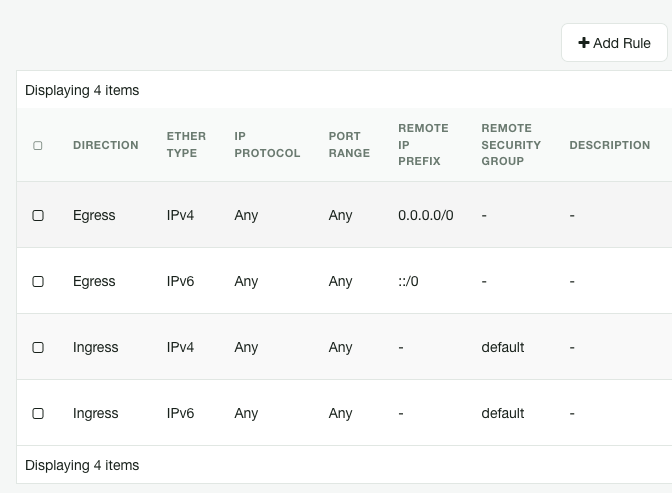
In a typical default Antares configuration:
- outgoing traffic (Egress) is allowed,
- incoming traffic (Ingress) from members of the same
defaultSecurity Group is allowed, - arbitrary incoming traffic from external networks is not automatically allowed.
SSH Is Not Automatically Allowed
A newly created Linux instance is normally not accessible via SSH from an external network, even if a Floating IP has been assigned.
Always check the actual rules under:
Project → Network → Security Groups
Allow SSH Access
SSH normally uses:
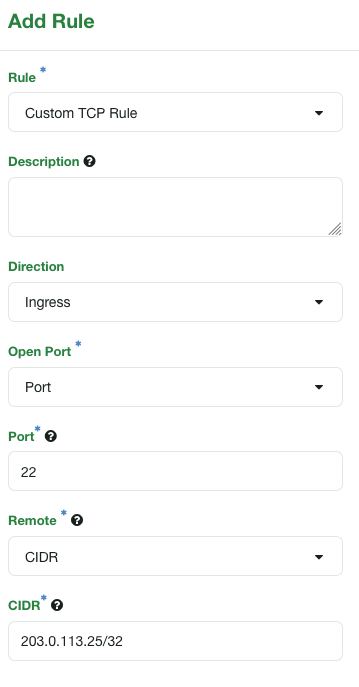
A corresponding Security Rule could look like this:
| Direction | Protocol | Port | Source |
|---|---|---|---|
| Ingress | TCP | 22 |
Your public IP address |
A very broad rule would be:
0.0.0.0/0 means:
This allows SSH connection attempts from anywhere on the Internet.
A more restrictive rule would be:
The /32 specifies exactly one IPv4 address.
Use the Principle of Least Privilege
Only allow network access that is actually required.
For administrative services such as SSH, restrict access to your own public IP address or your organization's network whenever possible.
Common Ports
| Service | Protocol | Port |
|---|---|---|
| SSH | TCP | 22 |
| HTTP | TCP | 80 |
| HTTPS | TCP | 443 |
| RDP | TCP | 3389 |
For example, a public web server may require:
SSH access could still be restricted separately to an administrator's IP address.
Separate Security Groups by Purpose
Instead of putting all rules into one Security Group, it is often useful to separate them by purpose.
For example:
A webserver Security Group could contain:
An ssh-access Security Group could contain:
This makes the configuration easier to understand and reuse.
8. Create an Instance
After preparing the network, router, SSH key pair and Security Groups, you can create your first instance.
Open:
Project → Compute → Instances
Then select:
Launch Instance
8.1 Details
First, enter a name for the instance.
For example:
Depending on your Antares environment, additional settings such as the availability zone and number of instances may be available.
For your first instance, the default settings can usually be used unless your Antares operator provides different instructions.
8.2 Select an Image
Under Source, select the operating system for the instance.
Antares normally provides operating systems as Images.
Examples include:
An Image is essentially the template used to create the operating system of the instance.
The available Images are provided by the operator of the Antares environment.
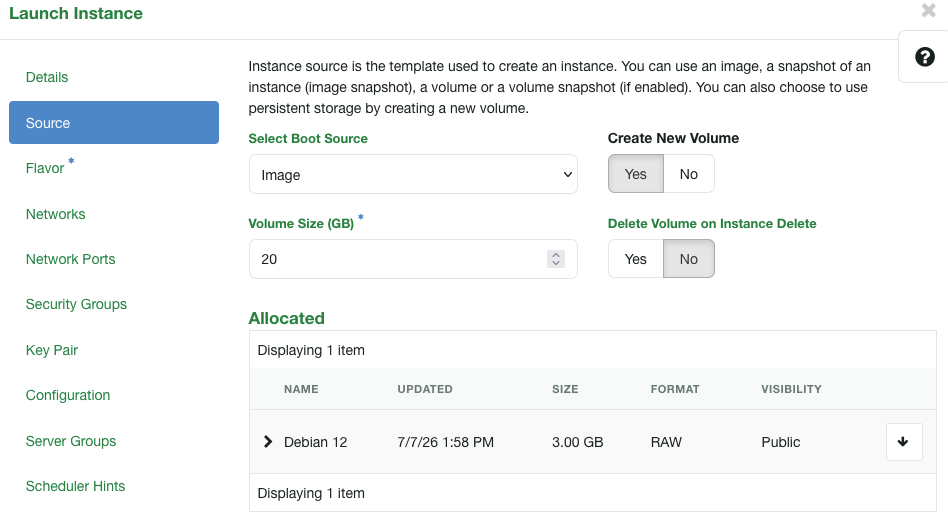
8.3 Create a Volume
For persistent instances, it is recommended to store the root filesystem on a Volume.
When selecting the source, configure the instance to create a new Volume from the selected Image.
For example:
Then specify the required Volume size:
Antares creates a Volume based on the selected Image and boots the instance from that Volume.
The process can be visualized as:
A Volume provides persistent block storage and can be managed separately from the Compute instance itself.
Delete Volume on Instance Delete
Pay particular attention to the following option:
If this option is enabled:
If this option is disabled:
Data Loss
Deleting a Volume may permanently delete the data stored on it.
Always check the Delete Volume on Instance Delete setting before deleting an instance.
8.4 Select a Flavor
The Flavor defines the virtual hardware resources available to the instance.
This includes:
- virtual CPUs (vCPUs),
- memory (RAM),
- local instance disk.
c1 Flavor
| Flavor | vCPUs | RAM | Disk |
|---|---|---|---|
c1.tiny |
1 | 2 GB | 40 GB |
c1.small |
2 | 4 GB | 40 GB |
c1.medium |
4 | 8 GB | 40 GB |
c1.large |
8 | 16 GB | 40 GB |
c1.xlarge |
16 | 32 GB | 40 GB |
c1m Flavor
| Flavor | vCPUs | RAM | Disk |
|---|---|---|---|
c1m.tiny |
1 | 4 GB | 40 GB |
c1m.small |
2 | 8 GB | 40 GB |
c1m.medium |
4 | 16 GB | 40 GB |
c1m.large |
8 | 32 GB | 40 GB |
c1m.xlarge |
16 | 64 GB | 40 GB |
8.5 Booting from an Image
If no Volume is provided to an instance, a disk is automatically used with the size specified by the selected Flavor.
This disk is not a Block Storage Volume and cannot be managed through Antares Block Storage. Therefore, it cannot use the available Storage Types.
The size of this disk cannot be changed after the instance has been created.
In addition, Volume Backups cannot be created for this disk.
Snapshot functionality is available with limitations. When a snapshot is created, the instance disk is copied to the Image Store and stored as an Image.
To use this snapshot, either:
- create a Volume from the snapshot Image, or
- start a new instance from the snapshot Image.
Warning
Booting an instance directly from an Image is not recommended. However, there are use cases where this configuration may be appropriate.
8.6 Select the Network
Under Networks, select the private network created earlier:
Antares creates a network port for the instance and assigns a private IP address from the configured subnet.
For example:
At this point, the instance is connected to the private Antares network.
8.7 Select Security Groups
Under Security Groups, select the Security Groups required by the instance.
For a Linux instance that should be accessible via SSH, a Security Group containing a rule for TCP port 22 is required.
For example:
For a web server, you might additionally assign:
This results in an instance using multiple Security Groups:
The effective access permissions are the combination of the rules contained in all assigned Security Groups.
8.8 Select the Key Pair
Under Key Pair, select the SSH key imported earlier.
For example:
During the first boot, the public key is usually installed in the instance using cloud-init.
The corresponding private key remains on your local computer.
8.9 Launch the Instance
After reviewing the settings, select:
Launch Instance
Antares now starts creating the instance.
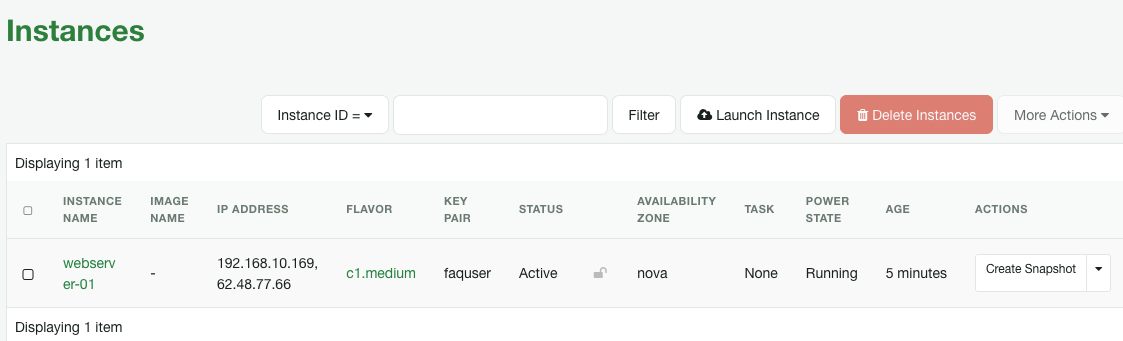
After a short time, the instance status should change to:
At this point, the instance may look like this:
The instance is now running inside the private network.
To access it from an external network, assign a Floating IP.
9. Connect via SSH
Before connecting, make sure the following requirements are met:
- The instance is
ACTIVE. - A Floating IP is assigned.
- The Security Group allows TCP port
22. - The correct SSH key pair was selected during instance creation.
- The router connects the private network to the external network.
Assign the Floating IP
Open:
Project → Compute → Instances
Then:
- Select the desired instance.
- Select Associate Floating IP.
- Select an existing Floating IP or allocate a new one.
- Assign the address to the instance.
The network configuration may now look like this:
Establish an SSH Connection
The basic SSH command is:
The username depends on the Image.
Common examples are:
| Image | Common Username |
|---|---|
| Ubuntu | ubuntu |
| Debian | debian |
| Rocky Linux | rocky |
| AlmaLinux | almalinux |
The exact username should be documented by the provider of the Image.
Specify the Private Key
If SSH does not automatically select the correct key, specify it explicitly:
Remember:
Local Computer
│
├── id_ed25519 ← Private Key
│
└── id_ed25519.pub ← Public Key
│
▼
Antares
│
▼
Instance
The private key never leaves your computer.
10. Troubleshooting
Floating IP Is Not Reachable
Check the configuration step by step:
Is the instance ACTIVE?
│
▼
Is a Floating IP assigned?
│
▼
Is a router configured?
│
▼
Is the router connected to
the private subnet?
│
▼
Does the router have an
External Network configured?
│
▼
Are the Security Group
rules correct?
SSH Connection Times Out
A timeout usually indicates a network or firewall problem.
Check:
- Is the Floating IP correct?
- Is TCP port
22allowed? - Is the correct Security Group assigned?
- Is the router connected correctly?
- Is the instance fully started?
- Is the source IP allowed by the SSH Security Rule?
Permission denied (publickey)
If you receive:
the instance is usually reachable, but SSH authentication has failed.
Check:
- Are you using the correct private key?
- Did you select the correct Key Pair when creating the instance?
- Are you using the correct username?
- Does the private key have the correct filesystem permissions?
On Linux:
Then try again:
11. Recommended Workflow
For a new Antares project, the following order is recommended:
1. Log in
   │
   ▼
2. Change password
   │
   ▼
3. Import SSH Key Pair
   │
   ▼
4. Create private Network + Subnet
   │
   ▼
5. Create Router
   │
   ▼
6. Connect Router to private Subnet
   │
   ▼
7. Configure Security Groups
   │
   ▼
8. Create Instance
   ├── Select Image
   ├── Create Volume
   ├── Select Flavor
   ├── Select private Network
   ├── Select Security Groups
   └── Select Key Pair
   │
   ▼
9. Allocate and assign Floating IP
   │
   ▼
10. Test the connection

1. Log in
   │
   ▼
2. Change password
   │
   ▼
3. Import SSH Key Pair
   │
   ▼
4. Create private Network + Subnet
   │
   ▼
5. Create Router
   │
   ▼
6. Connect Router to private Subnet
   │
   ▼
7. Configure Security Groups
   │
   ▼
8. Create Instance
   ├── Select Image
   ├── Create Volume
   ├── Select Flavor
   ├── Select private Network
   ├── Select Security Groups
   └── Select Key Pair
   │
   ▼
9. Allocate and assign Floating IP
   │
   ▼
10. Test the connection
12. Storage Types
Storage Types are available when using Block Storage Volumes.
Normal SSD
- up to 10,000 IOPS
- up to 250 MB/s
Performance SSD
- up to 20,000 IOPS
- up to 500 MB/s
High Performance SSD
- up to 40,000 IOPS
- up to 1,000 MB/s
Overview
| Storage Type | Maximum IOPS | Maximum Throughput |
|---|---|---|
| Normal SSD | 10,000 IOPS | 250 MB/s |
| Performance SSD | 20,000 IOPS | 500 MB/s |
| High Performance SSD | 40,000 IOPS | 1,000 MB/s |
13. Terminology Overview
| Term | Description |
|---|---|
| Instance | A virtual machine running inside Antares |
| Image | Operating system template used to create an instance |
| Flavor | Defines CPU, RAM and other Compute resources |
| Volume | Persistent block storage |
| Network | Virtual network used to connect instances |
| Subnet | IP address range within a network |
| Router | Connects different Antares networks |
| Floating IP | External IP address that can be assigned to an instance |
| Security Group | Virtual firewall containing multiple rules |
| Security Rule | Individual rule allowing specific network traffic |
| Key Pair | SSH key pair used to authenticate with an instance |
| Horizon | Antares web-based user interface |
| cloud-init | Mechanism used to perform initial instance configuration |
Summary
A typical Antares instance combines several components:
                    External Network
                           │
                    [ Floating IP ]
                           │
                        Router
                           │
                    Private Network
                           │
                    Private Subnet
                           │
                           ▼
                     ┌───────────┐
                     │ Instance  │
                     ├───────────┤
                     │  Flavor   │
                     │  Volume   │
                     │  Key Pair │
                     └───────────┘
                           │
                    Security Groups
Each component has a specific purpose:
- The Image provides the operating system.
- The Volume provides persistent storage.
- The Flavor defines CPU and RAM resources.
- The Private Network connects instances.
- The Router connects the private network to the external network.
- The Floating IP provides external reachability.
- Security Groups control allowed network traffic.
- The Key Pair provides secure SSH authentication.
Once these components are configured, the basic infrastructure required to run and access an Antares instance is ready.